Announcement: Fixed departure groups for


For Panpatia col trek, you have to need experienced about the hard trek.The most important thing for this trek is that you must choose an experienced trekking company. Many times people make a mistake that they choose a trekking company, who has not got too much experience which is risky for the trekker.
While you have got information about this trek than make sure book the trek.
You also need to be experienced potter for this trek
You must need technical equipment, good tents and sleeping bags for this trek.
West Bengali and Kolkata’s trekkers often come for this trek because they like to visit this place.
If you choose our trekking company Himalayan Hikers than it is better for you because Himalayan Hikers is a local company our mission is safe treks, growth of locals.
Himalayan Hikers has vastly experienced 28 years.
Due to the local company (Himalayan Hikers) we are aware of this place
We know the climate and difficulties, and how to deal with this type of difficulty.
So make sure chose the local company that has got vast experience.
Panpatia Col Trek Trail
The Panpatia col trek route was used by devotees to trek from Kedarnath to Badrinath, it was closed but some travelers reopened the route and used it for trekking.
On this trek cross high passes, flowing streams, moraine areas, and narrow cliffs which makes this trek a difficult one in Garhwal region.
Reach the Snout of Panpatia Glacier and come across Madhmaheshwar in Panpatia Col Trek
Camp just under the Panpatia glacier after reaching the snout, ahead the trail will lead to Panpatia Plateau.
The strenuous descending takes you to the campsite which faces Madhmaheswar Ganga and another day goes to Madhmaheswar temple.
Exciting Adventure in Panpatia Col Trek
There are exotic and thrilling campsites with many water-bodies. Here, the Himalayan meadows blossom with a variety of species of flowers and the high altitude requires acclimatization because the treeline recedes and the air gets thin which causes high altitude problems.
But, Panpatia col trek is the real gem for the experienced trekkers who have equipment knowledge and skills.
Panpatia Col Trek Complete Guide
Our mission has always been to ensure that no trekker steps into the Himalayas without the right perspective. A trek is not just a checklist of summits; it is a serious commitment to the outdoors. Having the right information is what separates a reckless climb from a soulful journey.
This section serves as your definitive manual for the Panpatia Col Trek. We have distilled years of mountain experience and real-time feedback into this guide to give you a clear, honest picture of the trail.
We provide this depth of information because we want you to be more than just a visitor—we want you to be a prepared, responsible trekker who respects the mountains as much as we do.
Day1 – Drive from Dehradun to Badrinath (3133 m)
Day2 – Acclimatization Day
Day3 – Badrinath to Shepherd camp (3579 m)
Day4 – Shepherd camp to Snout camp (3919 m)
Day5 – Snout camp to Moraine camp (4300 m)
Day6 – Acclimatization Day
Day7 – Moraine camp to Parvati Col’s Base (4599 m)
Day8 – Parvati Col’s Base to Panpatia snowfield camp (5219)
Day9 – Panpatia snowfield camp to Panpatia Col (5260 m) descent to Sujal Sarovar (4750 m)
Day10 – Sujal Sarovar to Kachni (4159 m)
Day11 – Kachni to Nanu Chatti (3259 m)
Day12 – Nanu Chatti to Ransi (1949 m) and Drive to Rudraprayag
Day13 – Rudraprayag to Dehradun
Day 1
Day 2
Day 3
Day 4
Day 5
Day 6
Day 7
Day 8
Day 9
Day 10
Day 11
Day 12
Day 13
Day 1 – Drive from Dehradun to Badrinath (3133 m)
The vehicle will be arranged from Dehradun Railway station, meet there at 6:30 in the morning. Drive is along the bank of River Ganga after you reach Devprayag relish the sight of Bhagirathi River gushing into River Alaknanda.
The Mountain views are amazing along the flowing river from Devprayag’s confluence. Have lunch en route and in the evening you can reach Badrinath. The arrangements will be made in a guest house or a hotel there.
Day 2 : Acclimatization Day
Get yourself prepared for upcoming trek and visit Badrinath temple; the shrine of Lord Vishnu. Rest for the day and sleep comfortably in a hotel.
Day 3 : Badrinath to Shepherd camp (3579 m)
The trek is towards Shepherd camp, start the ascent and come across the receding treeline. Trek for some hours and reach the campsite which offers marvelous views of the surroundings.
Set up your camps and retire for the night.
Day 4 : Shepherd camp to Snout camp (3919 m)
Today you will trek on a different type of terrains. Cross a sheer climb to reach the snout of Panpatia glacier, from there campsite can be reached in 10 minutes. Set up your camps there and retire early for the night.
Day 5 : Snout camp to Moraine camp (4300 m)
The trek today is long and you are going to gain altitude but the level will be moderate. Ascend gradually and cross the moraines which look never-ending but traversing the patches of snow is fun.
From the moraine camp catch views of Parvati and Neelkanth mountains with the first exciting sight of Chaukhamba.
Day 6 : Acclimatization Day
As you are going to gain altitude air gets thin and problems may occur so acclimatization is highly important on this trek because it cures altitude sickness.
Day 7 : Moraine camp to Parvati Col’s Base (4599 m)
From Moraine camp head towards the base of Parvati Col by crossing the uphill trek which inclines strenuously. Reach the base, set up your camps below Parvati Col and retire for the night.
Day 8: Parvati Col’s Base to Panpatia snowfield camp (5219)
The climb today is steep which will lead to the edge of the terrace. The only way to head forward is through rock gully and steep snow. Cross gentle humps from where Parvati Col and Panpatia snowfield can be reached.
From here rising peaks of Chaukhamba and Nanda Devi peak is visible. Set up your camps at the campsite, wear enough warm layers and retire for the night.
Day 9 : Panpatia snowfield camp to Panpatia Col (5260 m) descent to Sujal Sarovar (4750 m)
Cross Panpatia snowfield camp, the trek is long but with very few ascents. Traverse a short ascent at the end and reach Panpatia Col which is at a high altitude of 5260 meters above the sea level.
Move ahead and start descending towards Sujal Sarovar, your campsite for today. Come across the watershed of Madhyamaheshwar and set up your camps near this small lake and retire for the night.
Day 10: Sujal Sarovar to Kachni (4159 m)
Post breakfast leaves for Kachni, the trail is few meters above Sujal Sarovar which descents to this small lake through boulder zone and snowy slopes.
Reach the meadow and Madhmaheshwar Ganga can be seen in front. A temple is also visible from here, set up your camps at this amazing place and settle for the day.
Day 11: Kachni to Nanu Chatti (3259 m)
Today visit Madhmaheshwar temple, you can reach there in 3 to 4 hours. Ahead go through the forest of oaks to camp for the night at Nanu Chatti, it is the small settlement of Gaundhar villagers which is used in summers. Set up your camps and retire for the night
Day 12: Nanu Chatti to Ransi (1949 m) and Drive to Rudraprayag
Go through the thick forests of pine and reach Madhmaheshwar Ganga’s bank. Ransi is the endpoint of this trek, from there the drive is towards Rudraprayag. Check in to a hotel and comfortably sleep in a hotel.
Day 13: Rudraprayag to Dehradun
After having breakfast leave for Dehradun through the same route.
Key Points About Panpatia Col Trek
Level: Difficult (so first-timers trekkers should avoid)
Proper conditioning & training of body required
Need proper gear & clothing for sub-zero temperatures?
Shoes are the single most important equipment
High Altitude requires proper acclimatization
Post monsoon or pre-monsoon is the best time. During rains, the region is prone to landslides
Phones don’t work on the trek
The beautiful landscape so carry good photo gear (I couldn’t carry my best equipment)
Travel light (my backpack was heavy at about 10 kg to 12 Kg )
Keep an extra day in your itinerary for crossing the passto account for bad weather
Best Season – Mid May to Mid Oct
No How to Reach the Base Camp available.

Necessary Items for trekkers
Mandatory Documents
Original and photocopy of government photo identity card- (Aadhar Card, Driving License, Voters ID, etc,)
Passport and Visa important to foreigners
Medical Certificate (First part should be filled by the Doctor and Second part by the Trekker)
Declaration Certificates
Note: – Many trekkers commit the same mistake of carrying unnecessary items on a trek which only makes the backpack heavy. It is important to know the right items to carry. It differs from season to season if you are trekking in summers then carry less layers of warm clothing and if you are trekking in winters carry enough layers to protect yourself against chilly cold.
Basic Trekking Gears

The Clothes You Should Bring On Satopanth Expedition

Head Gears

Foot Gears

Personal Care Essentials

Carry a Personal Medical Kit

Are you Looking for Trekking Equipment on Rent?
If any trekker requires trekking equipment on rent, Himalayan Hikers offers the best-quality gear available for rental. Many individuals are in need of such equipment, and renting provides a cost-effective solution, allowing them to access high-quality gear at an affordable price without the need for a significant investment for short-term use.

Trek Equipment You can book directly on first day at the Base Camp.
Note:-
Please take all medicines only when prescribed by the doctor. In case you face any problem during your trek,
discuss and take advice from the Professional guide.
The Trek is one of the most popular treks in Uttarakhand, Himachal,Kashmir,Laddakh,Sikkim,Nepal, requiring both physical preparation and mental readiness. Although it is categorized as a moderate trek, reaches an elevation of over 12,720 feet and traverses remote Himalayan terrain, which can be physically and mentally challenging. Here's how you can prepare yourself for a safe and successful accomplishment of the Trek:
Physical Fitness
Building a good fitness base is essential for every trekker. The Trek itinerary involves 5 to 6 hours of walking every day. Though the trails are well-marked, they are often bumpy and include steep uphill sections, which may affect your stamina. You can overcome your physical limitation with a 6-week training program that you can begin about 2 months before your Trek. Your 6-week fitness routine should include
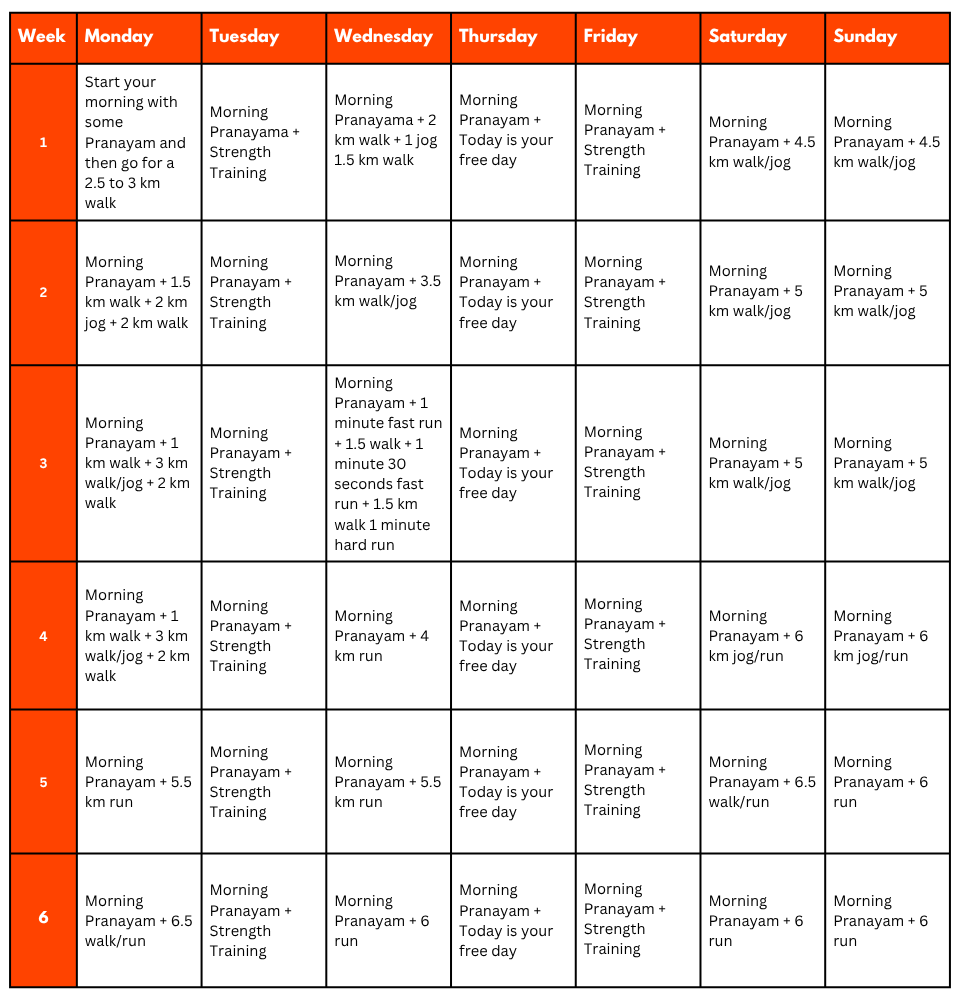
Pro Tip: If you have time, you can skip the Sunday training and go for a long-distance walk or mini day-hike (7–10 km) with a loaded backpack to simulate real trekking conditions. A short 1-day hike around your city/town can help a lot.
Mental Preparation
Physical strength is only half the journey, the other half is mental resilience. The trail takes you through remote clearings, steep climbs, cold starry nights, and no mobile connectivity. Be prepared to:
(I) - Detach from the digital world.
(II) - Embrace basic mountain living (camping, toilet tents, limited electricity).
(III) - Push through moments of fatigue, weather discomfort, or altitude effects.
A positive mindset, patience, and the ability to adapt will carry you farther than muscle ever could.Himalayan Hikers is a reputable trekking company that places a high priority on safety. Here are some of the safety measures they take to ensure the safety of their clients during the Trek:
Experienced Guides: Himalayan Hikers hires experienced and certified guides who are well-versed in the terrain, weather conditions, and local culture. These guides have first-hand knowledge of the routes and are equipped to handle any emergency situations that may arise.
Proper Gear: The company provides all the necessary gear and equipment to their clients to ensure comfort and safety during the trek.
Hygiene and Sanitation: Himalayan Hikers places great emphasis on hygiene and sanitation during the Trek. They provide clean drinking water, hand sanitizers, and toilet tents to ensure that their clients are healthy and comfortable.
Emergency Services: The company has a well-defined protocol for handling emergency situations. They have a team of trained medical professionals who are available 24/7 and can be quickly mobilized in case of an emergency.
Acclimatization: Himalayan Hikers follows a gradual acclimatization process during treks to ensure that their clients adjust to the high altitude gradually. They also monitor the health of their clients regularly and provide necessary medical attention if required.
Overall, Himalayan Hikers places a great emphasis on safety and takes all necessary measures to ensure the safety and well-being of their clients during treks.
What is Included In This Trek?
Transport Facility Dehradun To Dehradun
Forest Permit and entrance fee
Accommodation in tents on twin share basis
All meals: breakfast, packed lunch, tea, coffee, snacks, soup and dinner
(All camping gears)
High quality tents
Sleeping bags
Mattress
Liner
Pillow
Separate Toilet tents – Ladies and Gents
Dining Tent
Dining Table
Porters
Helper
Mules
Kitchen team
Radio Walkie Talkie for Communication
Good Experience Trek Leader guide and Technical guide
Medical Kit
Oxygen Cylinders
Crampons and Gaiters
What is Not Include In This Trek?
Personal Insurance
Medical Certificate
Personal toiletry Items and Personal Medicine kit
On first day En Route to base camp the Breakfast and Lunch are Not Included
Last Day En Route Lunch and Dinner are Not Included
Important Note
No important note.
Map not available for this trek.
No FAQs available for this trek.

.webp)